For years, I would make Jewish Apple Cake a couple of times each fall. It was a production. Great numbers of apples needed to peeled and sliced. I carefully tried to divide a batter into thirds. I prayed when it was time to remove the cake from the pan. Would it stick or would it come out cleanly and be presentable?
Last year, I found a new apple cake recipe. Sadly, I haven't gone back to the Jewish Apple Cake since. I discovered this new cake was the perfect camping cake. I make it in a 9x13" pan and all weekend, we snack on the cake--for breakfast while we wait for breakfast to be made, as a mid-morning/mid-afternoon snack, for dessert for lunch. It's perfect.
I also don't peel the apples or thinly slice them--cubing them is just fine. Sometimes, I mess up and don't follow the directions exactly--more than once, I forget put a layer of brown sugar/butter in the middle so I put a double thick layer on top. Regardless, this cake is good and gets eaten quickly, whether we are camping or at home.
Makes one 9x13" pan
Apple Cake
adapted from thekitchn.com
1 1/2 c yogurt, well stirred (don't use Greek, it's too thick and doesn't have enough liquid)
2/3 c oil
a scant 1/4 c fresh lemon juice
1 c sugar
3 large eggs
1 1/2 t vanilla
1 1/2 lbs tart apples, such as Granny Smith
2 1/2 c flour
2 1/2 t baking powder
3/4 t baking soda
1/2 t salt
pinch of freshly grated nutmeg
1/2 t cinnamon
1 c brown sugar
1 fat T cinnamon
4 T butter, at room temperature
Whisk together the yogurt, oil, lemon juice, sugar, eggs, and vanilla in a large bowl. Core the apples and chop into 1/2" chunks. Stir the chopped apple into the liquid ingredients. Add the flour, baking powder, baking soda, salt, nutmeg, and 1/2 t cinnamon into the liquid ingredients and stir just until no lumps (minus the apples) remain.
In a separate small bowl, combine the brown sugar, 1 T cinnamon, and butter.
Pour half of the apple batter into a greased 9 x 13" pan. Sprinkle half the cinnamon-brown sugar mixture over the apple batter. Carefully spread the rest of the batter over top. I find it's easiest to do this by dropping it by large spoonfuls onto the cinnamon-brown sugar and then carefully connecting the spoonfuls with a rubber scraper. Sprinkle the remaining cinnamon-brown sugar over the top.
Bake 45-55 minutes, or until a tester comes out clean in a preheated 350 degrees oven. If it is browning too fast, cover it with foil at the end. Let cool on a cooling rack for 15 minutes before cutting.
Showing posts with label Apples. Show all posts
Showing posts with label Apples. Show all posts
Tuesday, October 29, 2013
Wednesday, August 21, 2013
Curried Rice Salad
I've started feeling like I'm in a bit of a cooking rut this summer. I seem to just be making the same (wonderful, nonetheless) meals over and over. That's saying something too, since I had three weeks of not really cooking smack dab in the middle of the summer.
Maybe it's the multitude of eggplant, peppers, and summer squash that brings about the cooking doldrums. Maybe I'm just a little bit lazier this summer (that could be the case, because its been a really enjoyable summer...). However, I was ready for some new inspiration.
I have a list of potential cookbooks I'd like, but I've learned, I have limited real estate for cookbooks. I would like to find cookbooks that I cook many recipes from and that are different than the recipes I'm already using. Plus, the recipes need to be heavy on vegetables and not so heavy on meat.
Jerusalem has been a great match for that, but I needed more. So, I went to the public library.
This recipe is from one of my library cookbooks. It's a great Sunday afternoon meal, perfect for taking to the pool and eating there. It didn't use eggplant or summer squash, which was a disadvantage, but frankly, I'm tired of both those.
We all loved it, except for M. J was thrilled that it was vegetarian--that boy's deciding he's not a big fan of meat. I'll definitely make this again (and just let M fend for herself for supper. She's 8. She can handle that).
This originally called for fresh tomatoes, of which I had none. I omitted them and didn't miss them at all. I also didn't really measure the vegetables, just eyeballed it. This is the kind of recipe where you can do that without many negative effects (however, please, measure your spices). This reminded me of a curry dish, minus the meat or sauce.
Serves 4- 6.
Curried Rice Salad
adapted from Moosewood Restaurant Daily Special
1 c uncooked brown rice
1/2 t turmeric
1/2 t cinnamon
1/4 t salt
2 c water
1 c celery, diced
1 c sweet peppers, diced
1 c apples, diced
1/2 c currants or raisins
1/4 c olive oil
1/4 c lemon juice
1 T brown sugar
1 T fresh ginger root, grated
1 1 /2 t cumin
1 t curry powder
1/2 t cinnamon
1/2 t coriander
1/4 t cardamom
salt to taste
Greek plain yogurt
cashews, toasted and chopped
mango, diced (optional)
In a saucepan, combine the rice with the turmeric, 1/2 t cinnamon, 1/4 t salt, and water. Bring to a boil, cover, and simmer for 40 minutes or until the rice is tender.
Meanwhile, combine the vegetables in a large bowl. Whisk together the olive oil, lemon juice, brown sugar, ginger root, cumin, curry powder, cinnamon, coriander, and cardamom. Pour it over the vegetables and fruit and salt to taste.
Cool the rice for 15 minutes, then toss it with the vegetables and dressing.
Serve room temperature or cold, garnishing with yogurt, cashews, and mangoes, as desired.
Friday, October 12, 2012
Warm Arugula Chicken Salad
One of the first greens to show up in our fall CSA boxes is arugula. Tender leaves, a bit peppery, grace our boxes, a respite from all the other summer produce I've long grown tired of.
I have two favorite websites to get recipes from these days (in addition to pinterest of course). Farmhouse Delivery and The Year in Food never cease to awe and inspire me. Farmhouse Delivery is a local blog based off of seasonal eating, so I don't have to search in summer recipes for our October produce. A Year in Food just is beautiful. Beautiful.
While this recipe originally was a warm chicken salad, I transformed it to a warm arugula salad when I discovered the chicken I had reheated for the salad was extremely freezer-burnt and I couldn't stand to eat it. (True story). Next time, I plan on trying this again with chicken, but preferably chicken that hasn't been frozen yet....maybe a nice leftover chicken recipe for a roasted or rotisserie chicken. If you want to leave out the chicken to make this vegetarian, you can. You'll just have a nice, not-warm arugula apple salad instead.
I didn't serve this to the kids. Curtis and I polished this off nicely for a Saturday lunch all by ourselves.
This serves 2 as a main dish.
Warm Arugula Chicken Salad
from Farmhouse Table (Farmhouse Delivery)
leftover roast chicken, wrapped in foil and re-warmed at 350 (save juices and drippings) (optional)
1/2 bunch arugula, washed carefully, stems removed, and torn
1 apple, sliced as thinly as possible
2 -3 sweet peppers slivered (if you have other sweet peppers besides bell, definitely use those!)
2 T pine nuts, toasted
1 T rosemary, minced
juice of 1/2 lemon
2 T sherry vinegar
1 T whole grain mustard
1/2 c olive oil
Combine warm chicken (if using), arugula, apple, sweet peppers, and pine nuts in a large salad bowl or serving platter. Place rosemary, lemon juice, vinegar, mustard and olive oil in a small glass jar and shake vigorously until oil appears to be mixed in. Add the saved chicken juices/drippings (if using), and continue to shake. Add half the dressing to the salad and toss well to combine. Serve the reminder of dressing on the side (in case someone wants more dressing).
Serve immediately.
Saturday, January 21, 2012
So Much More than Beans and Rice
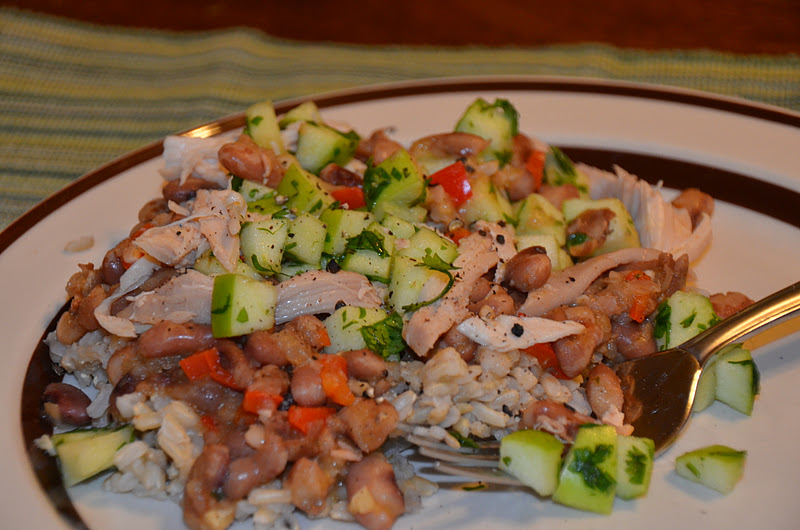
Those who have been reading this blog since is conception many moons ago, may remember, if you have a memory like an elephant, that M is not a bean fan. It often takes coercion, unless it is lentils which she loves.
Tonight, M ate only beans for supper.
Those who read my post two short posts ago may remember I said that my boys aren't eating my supper or liking my food. Today, J ate a serving of supper and asked for more. (Little I wouldn't touch, so at least someone is true to form).
I was less than excited about tonights' meal, part of our eat more healthy plan. Beans and Rice. Sigh.
This is so much more than beans and rice. It's what my family called Mexican haystacks (tacos on rice), but all together different. It's beans and rice go gourmet. It's absolutely yummy. I will make this again and next time, I'll be much more excited about making it. If you want to simplify this, use 1 - 2 cans of black beans in place of the dried beans. I prefer the dried beans because I better control the sodium content.
I changed up this recipe a bit. The original was in Bon Appetit's January 2012 issue.
This will serve 4 in these proportions.
So Much More than Beans and Rice
adapted from Bon Appetit
1 c dried anasazi or black beans
1 T bacon grease or olive oil (guess which I used)
1/2 onion, diced
1 lg clove garlic, minced
1 c Granny Smith apple, cored and chopped
1/4 c chopped cilantro
1/2 lime juiced
2 T olive oil
1/3 c (about 1/2 of...) red bell pepper
3 garlic cloves, minced
1 t chili powder
1 t ground coriander
1/2 - 1 t ground cumin
1 1/2 c chicken broth
3 c cooked brown rice
1 c cooked, shredded chicken (using a rotisserie chicken is easiest. Don't use frozen cooked chicken)
Cook anasazi or black beans. Quick soak method (because I always forget to soak them overnight): put the beans in a pot and cover with 3 inches of water. Bring to a boil, cover, and remove from heat. Let stand for an hour. Drain. In same pot, heat bacon grease or olive oil. Saute the onion until it is soft and slightly browned. Add the garlic and cook until fragrant. Return the beans to the pan. Cover with water (1 - 2 inches above the top of the beans/onions). Cook for 40 minutes for adzuki beans, or until tender. (Black beans will take a bit longer).
In a small bowl, combine the apple, cilantro, and lime juice. Set aside.
Heat 2 T olive oil in a saute pan or skillet. Add the bell pepper and cook until tender, about 5 - 6 minutes. Add the garlic, chili powder, coriander, and cumin and saute 1 - 2 minutes, stirring constantly. Add beans and broth. Bring to a boil. Reduce heat just until the beans are simmering briskly (not past medium in my case). Stir occasionally, smashing some beans with the back of a wooden spoon to help thicken the sauce. Cook for 8 - 10 minutes.
To serve: put a pile of rice on a plate. Top with beans followed by chicken and then apple/cilantro salsa. Season as desired with salt and pepper.
Saturday, November 21, 2009
Thanksgiving Bundt Cake

Here is another option if you are not a pie fan (I am not a huge pie fan, so I know there must be more like me out there) but still want a Thanksgiving type dessert. This baby is loaded--pumpkin, apples, cranberries, pecans, ginger, cinnamon, and nutmeg--everything that tastes like Thanksgiving but the turkey. Needless to say, this cake didn't last long at our house, between sharing it with preschool teachers, extended family, and eating it for breakfasts and snacks. It maybe made it twenty-four hours. I will make this again, and maybe even at a time other Thanksgiving.
I used frozen winter squash (either kabocha or butternut, not sure which) for this. Because the
liquid in the squash increases with thawing, I ran the squash through a fine sieve to get the excess liquid out. I was expecting to need to increase the cooking time as well, but didn't need to. I've renamed the cake from it's original name (All-in-One Holiday Bundt Cake) because Thanksgiving Cake just seems to sum it up better to me and is less words.
Thanksgiving Cake
from Baking: From My Home to Yours by Dorie Greenspan
2 c flour
2 t baking powder
1/2 t baking soda
2 t ground cinnamon
1/4 t freshly grated nutmeg
pinch of salt
1 1/2 t grated fresh ginger (1 t ground ginger)
10 T butter, at room temperature
1 c sugar
1/2 c packed brown sugar
2 large eggs, at room temperature
1 t vanilla
1 1/4 c pumpkin puree
1 lg apple, peeled, cored and finely diced
1 c cranberries, coarsely chopped
1 c pecans, coarsely chopped
Icing
6 T confectioners' sugar
2 T maple syrup
Stir together flour, baking powder, baking soda, cinnamon, nutmeg, salt, and ground (if you are using--not the grated ginger). Set aside. In a separate bowl, beat the butter and sugars together on medium speed (using an electric mixer) until they are light and fluffy. Add the eggs one at a time, and beat for 1 minute after each addition. Beat in the vanilla. Reduce the mixer speed to low and add the pumpkin, apple, and grated ginger (if you are using). The mixture will look curdled. With the mixer still on low speed, add the dry ingredients, mixing only until they are incorporated. Stir in the cranberries and pecans with a rubber spatula. Scrape the batter into a buttered and floured 9 - 10" Bundt pan. Smooth the top with a rubber scraper. Bake in a preheated 350 degrees oven on the center rack for 60 - 70 minutes (mine only took 60 minutes) or until a tester inserted into the center of the cake comes out clean. Cool in pan for 10 minutes, then unmold and cool on rack.
To make icing, sift 6 T of confectioner's sugar into a small bowl. Stir in maple syrup. Drizzle icing over cooled cake with a spoon. Allow icing to set a few minutes before serving.

Thursday, November 19, 2009
Cranberry Relish
 There are two camps of people who eat cranberries for Thanksgiving: those who like it sliced, straight out of a can, and those who like a homemade version made with raw cranberries. I am sure it comes as no surprise that I like homemade cranberry relish for Thanksgiving. I have two versions that I make. One version is more of a cranberry salsa which is wonderful on turkey, in turkey sandwiches, and as a dip for tortillas. That recipe is here. My other version is a normal cranberry relish which can feed a crowd and relies heavily on fruit. I made this for my kids' preschool Thanksgiving today.
  All it takes, plus sugar and crushed pineapple
Cranberry Relish
from Recipes to Cherish
1 - 1 1/2 pounds cranberries (raw)
2 apples, unpeeled, cored, and quartered
2 oranges, one peeled and one unpeeled, quartered
1 c crushed pineapple
1 - 1 1/2 c sugar
In a food processor, process the cranberries until they are finely ground. Transfer to a bowl. Then process the apples, and then oranges, doing each fruit separately. Combine apples, oranges, cranberries, and crushed pineapple in bowl. Taste. Add more processed cranberries if necessary. Add 1 c of sugar and mix well. Taste. If the relish is still overly tart, add more sugar until you reach desired sweetness.

Thursday, November 12, 2009
Tarte Tatin or Upside Down Apple Pie

I love apple desserts. Curtis would stick solely to apple pies, but I like a little variety--apple cake, apple brown betty, and now tarte tatin. I found this version of tarte tatin in Baking: From my Home to Yours by Dorie Greenspan. The recipe itself was pretty easy with not very much hands on time--the most time intensive thing was peeling, coring and quartering the apples. Caramelizing the apples took time, but most of that time, I ignored it. I just checked periodically to make sure the sugar wasn't burning.
Overall, I really liked this recipe for several reasons. 1) I made it in my cast iron skillet. 2) It looks nice when served and it appears I put a lot of time into it. 3) It tastes good. I'll make this again, but next time, I'll caramelize the apples longer and add a little bit of cinnamon to the apples.
Tarte Tatin
from Baking: From My Home to Yours by Dorie Greenspan
1 sheet (8 oz) frozen puff pastry (you can make other dough for this, but who can beat a puff pastry?), thawed
1/2 c unsalted butter
3/4 c sugar
8 - 9 firm apples, such as Gala, Cameo, Crispin, or Granny Smith, peeled, quartered, and cored
Roll out thawed puff pastry sheet on a lightly floured surface. Cut the dough into a circle that is 1" larger in diameter than the pan you are using (you can estimate this). Transfer to a baking sheet lined with parchment paper, prick all over with a fork, and refrigerate until you are ready to use it.
Put a 9 - 10" cast iron skillet over medium heat and add the butter. After it has melted, swirl it around in the pan so it coats the side with a thin layer of butter. Sprinkle the sugar over the butter and remove from heat. Cover the butter and sugar with a layer of apples, peeled sides down in concentric circles. Squeeze as many as possible into the first layer because they will shrink with cooking. Cut the remaining apple quarters in half and layer the leftover apples over top. (pictured at top) Put the pan over medium heat and cook until the sugar turns a deep caramel color. Depending on how hot you are cooking it, it will take 15 - 30 minutes. Check occasionally to be sure the sugar isn't burning and turn down heat if necessary. (If deep caramel color isn't achieved, like in my case, it will still be really good).
Remove from heat and top with refrigerated puff pastry dough, tucking excess edges in at the sides. Bake in a preheated 375 degrees oven for 35 - 40 minutes or until the pastry is baked through and puffed. Upon removing from the oven, cover the skillet with a large rimmed serving plate. With confidence and speed, and wearing good oven mitts, turn the tart out onto the platter and remove the pan. Let stand for 10 minutes before serving.

Tuesday, October 27, 2009
Peanut Apple Salad
I love this salad. I know Curtis isn't a fan (which is why I took this to our church's fall festival potluck) but I didn't know what the kids would think. They both liked it. J ate every bit of it, but M stuck to just the apples. It was an easy sell--"It's just apples and peanut butter."
8 apples, diced (they don't need to be peeled)
1/2 c celery, diced
1/2 c raisins
1/2 c pecans or walnuts
1/4 c shredded coconut
1/2 c peanut butter
1/2 c mayonnaise
1/4 c milk
1/4 c sugar
Combine apples, celery, raisins, nuts, and coconut in a very large bowl. Set aside. Combine remaining ingredients and pour over the apple mixture. Toss to coat the apples. Serve. Keep leftovers refrigerated.
Wednesday, September 23, 2009
Baby Food
 Baby I is getting older and that means he is almost ready to start eating solid foods. This is yet another reason I love being part of a CSA and shopping at Farmer's Market. I know exactly what food goes into my baby's body and where it came from. I know the farmer and I know nothing unwanted is sneaking in with the food, thanks to the organic produce.
As far as I am concerned, he is ready to eat solids at the perfect time. Apples are at the farmer's market. I am buying 2nds (the apples with spots that need a little work before they're ready to eat) and making applesauce (here's how to make applesauce using a KitchenAid and attachment). That will be followed by some of that wonderful orange winter squash I am currently processing (here's how to do that). I can also find pears at the farmer's market now and soon we'll be getting sweet potatoes in our CSA box. Perfect. When it's time, I'll get a small amount of
 local lamb (from the farmer's market) to introduce Baby I to meat and then chicken as well. By the time the rich leafy greens and broccoli are in season, he'll be ready to conquer those as well. I can't think of better way to get a child off the right start of eating.
Here's what I am up to on this cool fall day (which we so rarely get in September. September!! I love thee this year!). Applesauce and processing winter squash. I hope to make Kobacha muffins later this week! :)
Pictured are the apples before cooking and after I've cooked them down. They're now ready to process.
Thursday, September 10, 2009
Curtis' Apple Pie
 I love August/September/October because of apples, Crispins in particular. For the few weeks, Crispins show up at the Farmer's Market, we buy lots and lots of Crispins and store them into the refrigerator, saving them up for apples pies.
A couple of years ago, Curtis perfected his apple pie recipe. (Last year was an off year for Crispins, so we didn't have many apples pies). Here it is, a family classic, which I have never made---yet another reason why I love apple pie.
(Pictured is our handy, dandy apple peeler/slicer/corer)
 Curtis' Apple Pie
adapted from Shenandoah Valley Recipes
2 9-inch pie crusts
6 - 8 firm apples, peeled, cored, and sliced
1 T lemon juice
3/4 c brown sugar
4 T flour
1 1/4 t cinnamon
dash of nutmeg
2 T butter, melted
Place apples in a pie crust. Mix together lemon juice, brown sugar, flour, cinnamon, nutmeg, and butter. Sprinkle over apples. Place second pie crust over pie. Prick top so air can escape. Brush top of crust with milk and sprinkle with brown sugar and cinnamon. Bake in preheated 375 degrees oven for 50 - 60 minutes.
Friday, September 4, 2009
Jewish Apple Cake-Repeat Recipe
 Again, this was part of Curtis's birthday meal. He specifically requested this cake and since we had loaded up on apples (Crispins, my favorite baking apple), it was easy to oblige him. This also makes a great breakfast!
I start this post and thought I'd better double check to be sure this wasn't already on the blog. Sure enough, there is was way back in last October. So in case you've forgotten about this cake, which you never should. Here's the link to the recipe I posted a long, long time ago.
I have a feeling as I approach the year mark for this blog, I will need to double check for repeats more and more. Aaahh...the joys of eating seasonally. The old recipes are made new again every year.
Jewish Apple Cake
adapted from my Aunt's recipe
Monday, December 8, 2008
Arugula Autumn Salad

This is a nice way to use those huge bags of arugula you may be getting in your CSA box (or at the store, or grown in your backyard). Arugula has a different taste, but this salad is a great way to learn to appreciate it. The apples and caramelized pecans help the you not to notice the peppery taste of the arugula as much. I usually make a complete recipe of the pecans and dressing, but only use about 1/2 the arugula, apples, etc that is called for. I put the leftover pecans and dressing in separate containers in the refrigerator which makes the next salad a lot easier!
Carmelized pecans:
Mix together 1/2 c coarsely chopped pecans (or walnuts), 1 T corn syrup, and 1 T sugar. Toast in oven at 350 degrees until sugar begins to melt and nuts are toasted and coated. Watch carefully to avoid burning. After the nuts are done, remove them from baking pan promptly and transfer to parchment (or wax) paper. This will keep the nuts from becoming stuck to the baking pan.
The salad:
Toss together 1-2 thinly sliced tart apples (or pears) and 2 T lemon juice in a bowl. Add 6-8 c arugula (or any other mixed salad greens), 1/2 c Asiago cheese (goat or feta cheese are also good), caramelized pecans, and 1/2 c dried cranberries (optional). Toss gently with dressing (see below for dressing recipe).
Dressing:
Shake together in a jar with a tight lid 1/3 c olive oil, 1 T Dijon mustard, 1 T sugar, 2 T lemon juice, 1/2 t salt, and 1/4 t pepper.
Thursday, October 9, 2008
Mac and Cheese, Sweet Potato Fries, and Apple Muffins
The biggest hit of the day was Mac and Cheese with the Apple Muffins a close second. I also thought the sweet potato fries were great but M and J weren't too sure of them. I think that's because they've been spoiled by actual fried sweet potato fries at one of our favorite burger places.
I'll hit today's food in chronological order.
It was my turn to host playgroup this morning. We went to a couple of parks (long story) and I took apple muffins. It had been years since I made this recipe and I played with it a little, so I was somewhat nervous. However tasting a couple of them before we went, let me know they were ok. (One muffin wasn't enough for 3 people to share!). In a mixing bowl, I beat 2 eggs. I then stirred in 1 c milk, 1/2 c melted butter, and 2 c coarsely chopped, unpeeled apples. In a separate bowl, I combined 2 c unbleached all purpose flour, 1 c whole wheat flour, 1/2 t salt, 1 c sugar (if you use red, sweeter apples, use less sugar), 4 t baking pwoder, and 1 1/2 t cinnamon. I added the dry ingredients to the wet ones all at once and stirred just enough to moisten everything. I then spooned the batter into greased muffin tins and put the muffins in a preheated 400 degrees oven. Twenty minutes later they were done! The recipe makes about 22 not very big muffins.
Curtis worked this evening so it was just the kids and I . I decided it would be a good mac and cheese night. I have two easy mac and cheese versions. One is the super easy stove top version, the other is just as easy but a little longer baking time oven version. I opted for stove top tonight. I experimented for years about the best way to make stove top mac and cheese. The challenging part was always to get the cheese to melt correctly without making a white sauce. I finally just reverted back to my Grandma's version. Cook however much macaroni you want in a pot of boiling water as long as the package says. Drain and reduce the heat to low. Add a decent amount of Velveeta cheese (the inside of the box actually tells you pretty well how much to add) to the macaroni, plus a little milk. My Grandma always made her mac and cheese on the runny side, so I add more milk than some would prefer. I've found that you can add other cheeses to the Velveeta as well, but the Velveeta provides just the right melting consistency without getting too stringy like mozzarella or too clumpy like cheddar. You can't go wrong with that one. (And a person can have one processed food fall back, right?)
To make myself feel better about mac and cheese for supper, I used one of my sweet potatoes to make oven sweet potato fries. A real quick lowdown---cut the sweet potato into fry size pieces or wedges...the recipe I used called for 4 medium, I just used one large (it was just for 3 of us!). Throw the sweet potatoes in a bag of plastic container with a lid with 2 T oil and 1 t sea/kosher salt and shake. I then seasoned it with 1 minced clove garlic, about a T of fresh oregano, and 2 T fresh lemon juice and shook the bag some more. I baked them in a preheated 425 degrees oven for 30 minutes, flipping them every 10 minutes so they wouldn't get too dark on any one side. You know they are done when they are tender and a little browned.
Mmm...now that the kids are both asleep, I think it's time to go have another apple muffin!
Wednesday, October 1, 2008
Jewish Apple Cake and Zucchini Frittata
I published the recipe for zucchini frittata in an early post, so I'll just tell you about a couple of adaptations I made to the recipe. I needed a quick supper and once I started cooking I realized the recipe called for cooked brown rice. Bye, brown rice. That was omitted. To be sure I had enough food for us, I used 6 eggs instead of 4 and I substituted goat cheese for feta cheese. Despite all my tinkering with the recipe, it was still great and everyone (but the one who is boycotting suppers) ate at least one piece of frittata. I must admit the big hit of supper though was homemade strawberry jam on a slice on squash rolls....at least until dessert.
Dessert was Jewish Apple Cake. For a cake, it is not very difficult to make from scratch and if you use the right apples it is oh, so good! Curtis ate a piece for breakfast with a glass of milk. I would have if 2 children weren't watching me (and I would have had to share!). It has apples, so it's healthy right?

Here's how to make it. Peel, core, and thinly slice enough apples to equal 2 quarts. (This is the most time consuming step of the whole recipe! A mechanical apple peeler/slicer/corer speeds up the process considerably). Sprinkle with 2 T fresh lemon juice, 5 T sugar, and 1 T ground cinnamon. Toss gently to coat all apples with lemon juice, sugar, and cinnamon. Set aside. In a separate bowl, cream together 2 c sugar and 1 c oil. Add 4 eggs, one at a time, mixing well. In a third separate bowl, combine 3 c flour and 3 t baking powder. Add alternately with 1/2 c orange juice to creamed sugar mixture. Add 1 T vanilla and combine. Pour 1/3 of the batter into a very well greased bundt pan or large tube pan. Top with 1/3 of the apples. Repeat layers 2 more times, ending with the apples. Place the pans on doubled up cookie sheets (2 stacked cookies sheets) and bake in a preheated 375 degrees oven for 1/2 hour. Reduce heat to 350 and bake for 1 - 1 1/4 hours, until a cake tester inserted in the center comes out clean. Let the cake cool in its pan for 20 minutes before inverting it.
A couple of quick notes on the recipe. The cookie sheets prevent the bottom (which becomes the top) from becoming burnt, keeping it instead a nice golden brown. It also doesn't matter if your layers don't come out exactly in thirds. I always some how manage to have just barely enough batter for the final layer. All that means are there are more apples closer together at the bottom. It still tastes great. The cake could take as long as an extra 1 1/2 hours (instead of just one hour). The best apples are the "hard" apples or those that are green or tart.
Saturday, September 27, 2008
Farmer's Market
I didn't need much at the Farmer's Market today--just the bacon I couldn't find last week and apples. I also grabbed a couple of tamales to take home for lunch and some yummy juice. While there were just 2 things on my list (bacon and apples) I ended up making bigger purchases than usual.
Last week Curtis asked Dan, the apple guy, to set aside some Granny Smith apples for his pie making experiments. Dan said he'd set aside a box. Thus, I picked up a box (not a full box, but 20 pounds worth!) of apples for Curtis.
Apples have been a little hard to come by this year---at least the seconds I like for applesauce and the "hard" apples Curtis prefers for apple pies. From our visit to the apple orchard in Medina last year, I learned a little bit about apples. There are basically two different types of apples--hard and soft. Soft apples tend to the be beautifully red, very sweet apples. They are soft because they have a high sugar content and when cooked, they turn to mush quite quickly. Soft apples aren't good for pies or other baked goods like apple cakes. They are great for applesauce because they don't need to cook for very long before being a mushy mess in the pan. They also make the best eating apples (in my humble opinion) because of their sweetness.
Hard apples are the green apples. Conversely, they don't have as much sugar and therefore hold their shape better for baking. These are the apples that make wonderful pies and cakes. They are sometimes too tart for eating according to some people's tastes. A few of the hard apples are usually pretty good thrown into the applesauce made with soft apples because it gives a little more depth to the flavor. In our family, the favorite apples for pies are Crispin's early in the season and Granny Smith's later in the season (here, apple season is from July!! through October).
You also may find unpasteurized cider at the Farmer's Market. At our Farmer's Market, if you bring your own container, you can buy a 1 quart or 1/2 gallon of cider. The orchards don't bottle their own cider to sell because of pasteurization laws (which currently is why Goodflow Juice here in town isn't being sold currently). Again, according to the orchard we visited, the pasteurization laws were put into place to protect consumers from the massive, commerical orchards that used machinery to scoop apples off the ground to make into cider. (Warning, the following is rather disgusting in my mind, so skip ahead if you have a weak stomach). Sometimes these machines would scoop up mice in their apple gathering and the mice would get processed with the apples. The pasteurization makes sure that no E-coli may have seeped it to the cider. E-coli is spread through feces, thus the mice/vermin are the problem. No animals, no e-coli. That makes me thankful the laws are in place. However, for smaller orchards that pick the apples for cider by hand, that isn't a problem and they don't invest in the expensive equipment to pasteurize and seal their own containers. They don't feel their consumers are at risk because they know that no stray animals have wandered into their cider. The way around the law for them is to bring cider to sell by the cup or let the consumers bring their own containers to take the cider home in.
I hope we can use our 20 lbs of apples before I need to figure out how to fit all 20 lbs into the refrigerator. I am looking forward to making a Jewish Apple Cake....I just need to find some people to feed it to (our family can't eat a whole cake by ourselves!). I am guessing our apple peeler, corer, slicer will be a good investment by the time Curtis makes all of his pies!
Tuesday, September 9, 2008
How to Make Applesauce
In my effort to get away from buying any more processed food than necessary, I have started canning and freezing. Apples are in season now, so it is time to stock up on applesauce for the coming year.
I buy apples from the Sunset Valley Farmer's Market. My aunt went to high school in Pennsylvania with the guy who sells them, so I feel a weird sort of connection and keep going back to him. He sells a wide variety of apples. I've found that for applesauce, what works best are the "seconds." Seconds are apples that aren't perfect and not recommended (at least by me) as eating apples. They are usually a mix of whatever varieties are selling at the time--right now that is Crispins, Jonathans, and Fujis to name a few (I can't remember the rest). Because the seconds need spots cut out of them, they are significantly cheaper than the other apples.
To make the applesauce, I simply cut out the bad parts and quarter or sixth the apples. I try to get slices of somewhat equal sizes. I put a little bit of water in the bottom of the largest pot I have and throw the apples in. The water is mainly to prevent scorching, the apples themselves generally have enough water in them to make the right consistency of applesauce (this of course also depends on how much of each variety you have---the red, sweet apples have more water, and the green, tart apples have less water--which is one reason green apples are better for apple pies. They don't turn to mush in pies as fast as the red ones). I bring the apples to a boil, and then simmer until the apples are soft.
Once the apples are soft, I set up my kitchenaid mixer using the food and vegetable strainer attachment. The advantage to this is that you do not have to core or peel the apples before making applesauce. The attachment spits all that out the small hole on the end, while the applesauce comes down a chute at the bottom of the attachment. The whole process takes more or less 45 minutes. While the applesauce is still hot (but cool enough to taste), sweeten as much or little as you desire with sugar and season with cinnamon if you want.
I buy the ziploc disposal containers, 2 and 3 c sizes, and fill them mostly full, allowing a little headspace at the top for the applesauce to expand as it freezes. I throw it in the freezer and then pull it out whenever we want applesauce for a meal. Easy.
Subscribe to:
Posts (Atom)