For a while now, I've seen recipes for yeast waffles floating around the internet and in cooking magazines. Why? I wondered, would one make a quick break into a time intensive yeast bread?
This summer I found out why. My grandpa is on peritoneal dialysis (long explanation could follow, but I'd probably get a bunch of info wrong, so if you're really curious, just google it). Part of his treatment plans means strictly monitoring his diet so all of his electrolytes and nutrient levels stay in sync to not interfere with his blood pressure medicine. In other words, thought needs to go into what we make when he comes over for supper. My mom wanted to make waffles and gravy for supper. However, her normal recipe had an ingredient in it my grandpa couldn't have (baking powder? or was it baking soda? I can't remember). Yeasted waffles were our answer.
I've made these twice at my house since then. I like them better than my buttermilk waffles. They are easier to make and take less bowls/utensils (my recipe involves beating egg whites, and using three bowls). They seem to get crispier in the waffle maker. Plus, I just like the yeasty taste. Curtis isn't too sure about them yet. I've told him when he makes waffles and does the dishes, he can make whichever recipe he wants. :)
The one caveat of yeasted waffles--they need to sit, all alone, for an hour before you make them. I made these the day daylight savings time ended so I had hours before it was time to go to church. A way around the wait time is to make them the night before, let them sit for an hour, and then refrigerate them until the next morning when you want to make them. That sounds ideal. This recipe has been doubled--one recipe isn't enough, two makes great leftovers for the week.
This makes 8 - 10 Belgian-style waffles
Yeasted Waffles
from King Arthur Flour
3 c lukewarm milk
12 T butter, melted
1 1/2 t salt
2 t vanilla
4 large eggs
4 c flour
3 t instant yeast
4 - 6 T (1/4- 3/8 c) maple syrup, optional (I've done this both ways--I haven't missed it, so I'll probably always leave it out)
In a large bowl, combine all the ingredients, mixing well (some lumps are ok). Cover with plastic wrap and let rest at room temperature for an hour, or until the mixture begins to bubble. Cook the waffles in a preheated belgian waffle maker or refrigerate until you are ready to use.
Tuesday, November 6, 2012
Monday, October 29, 2012
Coffee-Cured Pulled Pork
My brother lives in Virginia. If you're not living under a rock or in a house without access to the outside world, you probably have heard about Hurricane Sandy. Although my family is 4 hours from the coast, with a nice mountain range or two separating them from any tides, schools in the area have shut down already. My brother is a teacher. He is contemplating a week, possibly, without school, if things go as are expected, and plans on cooking. A lot. This recipe is for him at his request. If his electricity holds up, this is in his plans.
I made this last week on the day the cold front moved through Central Texas. It's the perfect winter meal---it roasts in a somewhat low oven for 6 hours---6 wonderful hours of a meaty aroma and the warmth of an oven filling the house. My favorite part of the recipe was the burnt pieces, which was my kids' least favorite so it worked out perfectly! We turned these into sandwiches and may still turn them into tacos. The only thing about this recipe is it takes some planning ahead. The meat should cure for 12 - 24 hours before you begin roasting.
This serves a lot of people and makes around 2 1/2 lbs of meat when all is said and done.
Coffee-Cured Pulled Pork
from Food and Wine magazine
1/2 c sugar
1/4 c coarsely ground coffee
1/2 c kosher or sea salt (coarse grain)
4 lb bone-in pork butt (also known as a Boston Butt)
1/3 c molasses or sorghum
1/3 c apple cider vinegar
In a large bowl combine, sugar, coffee and salt. Add the pork and rub the mixture all over. Leave in the bowl, cover with plastic wrap, and refrigerate for 12 - 24 hours.
After the pork has cured, rinse the pork well and set in a roasting pan. Roast the pork, uncovered, in a preheated 300 degrees oven for 6 hours, or until a meat thermometer inserted into the thickest part reads 200 degrees. After the pork has roasted 2 hours, cover--either with foil or the lid of the roasting pan (if you have the roasting pan like I do). Once the meat thermometer reads 200 degrees. Remove the pork from oven and let rest for 30 minutes.
While the pork is resting (all that roasting was hard work, you know), boil the molasses and vinegar together in a small saucepan. Simmer until it is slightly reduced, about 10 minutes. While the sauce simmers increase the oven temperature to 500 degrees. Pour the glaze over pork and roast for 15 minutes (or less). Let cool, then shred the pork. Serve on buns with barbecue sauce (I think I sweet sauce would be best).
**Note, you may have noticed that after the curing, no salt was added anywhere. That's on purpose. Taste your meat before adding more salt. Otherwise, your pork will be way too salty.
Thursday, October 25, 2012
Warm Quinoa Salad with Grilled Chicken
I am in love with quinoa. Seriously. I love how it "pops" when it cooks. I could easily eat a bowl of quinoa just seasoned with a bit of salt.
My husband doesn't share my emotions. He can handle eating it, but is never thrilled by it. He endures it. That all changed with this dish. Maybe it was the fact I hadn't cooked for him in over a week (he worked late....I was out of town....), but he loved it. Maybe it was due to the fact it was a hot day and he had biked home (yes, a hot day in October--very common here in Austin). Regardless the reason, I was thrilled to find a quinoa recipe he loved.
We're not going to talk about the kids. I need to serve quinoa a dozen or so more times before they'll agree to eat it. It took them forever to start eating brown rice. Patience is required with my three (in so, so many things). They ate the grilled chicken eagerly and then Madeleine made them an alternate meal (so much easier to handle them not eating my cooking when I don't have to make the alternate).
I'll make this again, especially in the middle of winter when we are inundated with carrots. This could easily be made vegetarian by just serving the salad without the chicken (which is how I am eating it for lunch today!).
Warm Quinoa Salad with Grilled Chicken
adapted just a little bit from Food and Wine
1 c quinoa (red, black or regular--I use regular because it's $3 a pound cheaper)
2 c water
1/4 c pine nuts
3 T olive oil
3 garlic cloves, minced
1/2 medium onion, chopped
2 medium carrots, halved lengthwise and cut into half moons (quarter lengthwise if they are fat)
2 t ground cumin
1 T balsamic vinegar (or 1 T plus 1 t sherry vinegar)
1 lb boneless, skinless chicken breast, cut into 1" cubes
2 T mint leaves, coarsely chopped
Put the quinoa in small saucepan and cover with water. Add a generous pinch of salt and bring to a boil. Reduce heat, cover, and simmer for 15 minutes or until water is absorbed and the quinoa is tender, about 15 minutes.
Meanwhile, toast the pine nuts in a large skillet over moderate heat until fragrant. Watch carefully and stir often to prevent burning. Remove from the skillet and set aside. Heat the olive oil in a skillet. Add the onions and the garlic and cook over medium heat until softened, about 5 minutes. Add the carrots and cumin, cover and cook over low heat for about 5 minutes or until the carrots are just beginning to soften, about 5 minutes (you want them to still have a little crunch---not much, just not mushy carrots). Stir in the quinoa and vinegar. Season to taste with salt and pepper.
While the carrots are cooking, drizzle the chicken with olive oil and thread onto skewers (5 for us since there are 5 of us in our family). Season with salt and pepper. Grill over moderately high heat until the chicken is cooked through and browned, turning a time or two, about 5 - 10 minutes depending on how hot and even your grill is.
Garnish the quinoa and carrots with the pine nuts and mint. To serve, take a good sized serving of the quinoa and carrots. Top with the grilled chicken.
Friday, October 12, 2012
Warm Arugula Chicken Salad
One of the first greens to show up in our fall CSA boxes is arugula. Tender leaves, a bit peppery, grace our boxes, a respite from all the other summer produce I've long grown tired of.
I have two favorite websites to get recipes from these days (in addition to pinterest of course). Farmhouse Delivery and The Year in Food never cease to awe and inspire me. Farmhouse Delivery is a local blog based off of seasonal eating, so I don't have to search in summer recipes for our October produce. A Year in Food just is beautiful. Beautiful.
While this recipe originally was a warm chicken salad, I transformed it to a warm arugula salad when I discovered the chicken I had reheated for the salad was extremely freezer-burnt and I couldn't stand to eat it. (True story). Next time, I plan on trying this again with chicken, but preferably chicken that hasn't been frozen yet....maybe a nice leftover chicken recipe for a roasted or rotisserie chicken. If you want to leave out the chicken to make this vegetarian, you can. You'll just have a nice, not-warm arugula apple salad instead.
I didn't serve this to the kids. Curtis and I polished this off nicely for a Saturday lunch all by ourselves.
This serves 2 as a main dish.
Warm Arugula Chicken Salad
from Farmhouse Table (Farmhouse Delivery)
leftover roast chicken, wrapped in foil and re-warmed at 350 (save juices and drippings) (optional)
1/2 bunch arugula, washed carefully, stems removed, and torn
1 apple, sliced as thinly as possible
2 -3 sweet peppers slivered (if you have other sweet peppers besides bell, definitely use those!)
2 T pine nuts, toasted
1 T rosemary, minced
juice of 1/2 lemon
2 T sherry vinegar
1 T whole grain mustard
1/2 c olive oil
Combine warm chicken (if using), arugula, apple, sweet peppers, and pine nuts in a large salad bowl or serving platter. Place rosemary, lemon juice, vinegar, mustard and olive oil in a small glass jar and shake vigorously until oil appears to be mixed in. Add the saved chicken juices/drippings (if using), and continue to shake. Add half the dressing to the salad and toss well to combine. Serve the reminder of dressing on the side (in case someone wants more dressing).
Serve immediately.
Tuesday, October 9, 2012
Bun Chay
Alas that you think I am out of recipes with fish sauce, let me reassure you that I am not! This has been another easy, go-to summer recipe.
Here in ATX (also known as Austin, Texas), fall does not start just because a calendar says it should. Instead, summer lingers...with temperatures in the 90's all through September and a few days in the 90's sprinkled into October as well. Summer produce is still in full swing---with our CSA box being loaded with eggplant, peppers, summer squash, and zucchini.
Thus, I am still cooking summer recipes. I love this salad, plus its low calorie and low fat, which is always a plus. Just like the taco salad, the kids are a bit hesitant because of the all the lettuce, but they'll eat the noodles no problem.
This serves 4 - 6.
Bun Chay
adapted from thekitchn.com
1 lb tofu, pressed to remove extra water (place under a weighted plate for 30 minutes)
1/2 lb dried rice sticks or vermicelli
head of Romaine lettuce (3+ cups)
1 c cucumber, julienned
large handfuls of basil, mint, and cilantro, coarsely chopped
1/4 c fresh lime juice
1/4 c fish sauce or soy sauce (soy sauce will keep this recipe vegetarian/vegan)
1/4 c sugar
1/2 c water
1/4 c peanuts, chopped
Fry the tofu in a some vegetable oil heated in a large pan (you can either pan fry the tofu, using just a bit of oil or deep fry the tofu, using enough hot oil to cover the tofu). Drain excess oil and set aside.
Meanwhile, cook the noodles in a large pot of boiling water according to the package directions. Drain and rinse under cold water, separating the strands. Drain completely.
In a little jar, combine the lime juice, fish sauce (soy sauce), sugar, and water. Shake vigorously to combine.
To assemble the salad, place the lettuce in a large bowl and sprinkle with the fresh herbs. Toss with the cucumbers and tofu. Top with noodles and cucumbers and gently toss. Drizzle the salad with the sauce to taste. Serve and sprinkle with chopped peanuts if desired.
Thursday, October 4, 2012
Taco Salad
When I was 14, my family took a 6 week camping trip across the US in just a pop-up camper. We started in Virginia, made it to Pasadena, CA then up to Victoria Island, Canada, Banff National Park (also in Canada) and eventually back to Virginia. We camped at the Grand Canyon, Yosemite, and Yellowstone. We threw snowballs in Oregon in the middle of July and hiked on a glacier at Banff. We spent a sleepless night at Lake Meade, so hot, that we attempted to sleep on wet towels. We stayed at Circus Circus in Las Vegas and extra night or so (because we couldn't stand to spend another night at Lake Meade). We visited relatives in Kansas, California, and Wisconsin and saw moose, deer, elk, and other wildlife.
All this camping and traveling meant we ate lots of easy of meals at our campsite. One of our standby's was taco salad. Recently, I found a recipe for Taco Salad on culinate.com. Reading the recipe brought back all sorts of crazy camping memories of playing cards at our campsite and listening to ranger talks. I decided to make it.
This has quickly made it into our summer recipe rotation, especially when time was short for making supper. I took the recipe that had been updated (with ground buffalo meat and black beans) and reverted to the old recipe that I grew up with. Feel free to add buffalo or beef if you want, we do this one vegetarian.
The kids will eat this, although a bit begrudingly because of all the lettuce. I'm going to keep making it though, surely someday they'll start eating lettuce, right?
This serves 4 - 6 depending on how big your head of Romaine is and how hungry your crowd is.
Taco Salad
adapted from culinate.com
1 (15-oz) can kidney beans, rinsed and drained
1 - 2 T chili powder (I use New Mexico blend, great flavor, not very spicy)
1 (8-oz) bottle fancier French Dressing or Roasted Bell Pepper Dressing (Brianna's or Annie's)
1 pint cherry tomatoes, halved
1 head Romaine lettuce, washed, drained and chopped
1 c (4 oz) sharp Cheddar, grated
1 (2.25-oz) can sliced ripe black olives, drained
2 c tortilla chips, lightly crushed
In a small bowl, combine the beans, chili powder and a dash of salt. Set aside. Place the lettuce in a large salad bowl. Gently toss in the tomatoes, grated cheese, drained olives, and seasoned beans. Pour 3/4 of the dressing over the salad and toss. Taste and add more dressing if you'd like (we do). Top with crushed tortilla chips toss just a bit, and serve.
Monday, October 1, 2012
Favorite Pumpkin Whoopie Pies
By the time this posts, it will be October. October is fall at it's fullest, I think. It's the month of Halloween, the first frosts in Northern vicinities, anticipating cool fronts in all vicinities and winter squash. The name of this recipe is a bit inaccurate--in fact, there is no pumpkin in these whoopie pies. How exciting does butternut squash or kabocha squash whoopie pies sound though? There is no warm, cozy feeling emitted with either of those titles. So although, no pumpkins were harmed in the cooking of this recipe, I am leaving the title as is.
Last year when I made my old pumpkin whoopie pie recipe, I was a bit disappointed. It could be better, I felt, much better. This year, after I had cooked down four smallish butternut squash I searched for a new recipe.
I love this recipe. It has twice as much squash as my old recipe and fewer spices. That's a good thing. The flavor is better because of it.
This will make 2 dozen or so appropriately sized whoopie pies. I know, that's not enough. Just go ahead and double this recipe when you make it. They freeze fabulously--just thaw a bit before eating.
Favorite Pumpkin Whoopie Pies
adapted from browneyedbaker.com and Martha Stewart (maybe)
Cakes
3 c flour
2 T cinnamon
1 t baking powder
1 t baking soda
1 t salt
1 t ground ginger
a dash of freshly grated nutmeg (or 1/2 t ground nutmeg)
1 c sugar
1 c dark brown sugar
1 c canola oil
3 c chilled butternut squash, kabocha squash, or pumpkin puree (canned pumpkin)
2 eggs
1 t vanilla
Icing
8 oz cream cheese, at room temperature
1/2 c butter, at room temperature
3 c powdered sugar
dash of freshly grated nutmeg
1 t vanilla
In a medium bowl, whisk together flour, cinnamon, baking powder, baking soda, salt, ginger, and nutmeg. In a separate large bowl, beat with an electric mixer the sugars and the oil, until well combined. Add the pumpkin and continue to beat until to combine thoroughly. Add the eggs and vanilla and beat some more. Gradually add the flour mixture and beat gently until combined. Using a small ice cream scoop, drop rounded heaping tablespoons of dough onto baking sheets. Bake in a preheated 350 degrees oven for 12 or so minutes until a toothpick inserted in the centers come out clean. Remove from oven and let cool completely on the racks.
Meanwhile, make the icing. Beat together the cream cheese and butter until smooth. Add the powdered sugar and continue to beat until the icing is lump free. Stir in the nutmeg and vanilla to combine.
To assemble the whoopie pies, pair the cooled cakes together, looking for cakes that are similar in size. Top on flat side of the cake with icing. Top with the other cookie, flat side down against the icing.
Tuesday, September 25, 2012
Chocolate Semifreddo
Lest you think we just ate fish sauce this summer, let me reassure you we didn't by sharing this recipe. Chocolate semifreddo. Before making this recipe, I didn't know what a semifreddo was. I was drawn to it because it was frozen and had the word chocolate in the title.
Semifreddo is basically a frozen mousse. It is an Italian dish and if you are comfortable with whipping cream/beating eggs and folding things into the light airy beaten eggs/cream, it is easy to make.
We all enjoyed this. The original recipe also included a instructions for making a chile-chocolate sauce. I omitted that and just used a good chocolate sauce in it's place. The cinnamon whipped cream is fabulous though, and leftovers are great in coffee!
This serves 8 - 12 depending on how thick you make the slices.
Chocolate Semifreddo
adapted from Bon Appetit
2 large egg whites
1/4 c sugar
4 oz semi or bittersweet chocolate (don't exceed 61% cacao)
2 T butter, at room temperature
1 c chilled heavy cream
1 c chilled heavy cream
1 T sugar
1/4 t ground cinnamon
1 t vanilla
good chocolate sauce (probably a step above Hershey's) (optional)
Line a 9x4 1/2x3 loaf pan with plastic wrap, leaving a 2" overhang. Set aside. Whisk the egg whites and 1/4 c sugar in a medium heatproof bowl set over a medium saucepan of simmering water until sugar dissolves and egg whites are warm (but not hot), about 5 minutes (this helps reduce the risk of salmonella). Remove from heat. Using an electric mixer fitted with a whisk, beat on medium-high speed until cool, tripled in volume, and stiff peaks form. (Check this periodically by putting spoon into the egg whites and seeing if they will stay standing in peaks).
Stir chocolate and butter together in another heatproof bowl over the same saucepan of simmering water until melted and smooth. Remove from heat and let cool, slightly.
Beat 1 c cream in another medium bowl until medium-stiff peaks form (the peaks should just gently fall over onto themselves). Using a rubber spatula, gently fold the egg whites into the chocolate. Fold in the whipped cream. Be careful not to over-fold. Stop folding as soon as the mixture is smooth and of uniform color. Scrape the mixture into the prepared loaf pan. Smooth top and cover tightly with the remaining overhang of plastic wrap. Cover tightly and freeze until firm, 3 - 4 hours.
To make the whipped cream, combine the 1 c cream, 1 T sugar, and ground cinnamon in a bowl. Using an electric mixer fitted with the whisk again, beat until soft peaks form. Stir in vanilla and beat a little longer (don't over beat you will end up with cinnamon-vanilla butter).
To serve, uncover semifreddo and invert. Slice, using a knife dipped in hot water and wiped dry. Garnish with whipped cream and chocolate sauce.
Friday, September 21, 2012
Fish Sauce Fixes Everything
In the summer of Fish Sauce, I learned that indeed, a grill plus fish sauce can turn even food I don't like at all into something I eagerly anticipate. (True story!!). When I found this recipe in Bon Appetit in July's issue, I got excited. It used everything we had gotten in our CSA box this week, plus the ears of corn that were sitting in the fridge, waiting to be used.
The key to everyone eating this was serving things separately. I had a bowl with the roasted corn in it, another with the rice, a third with the herbs, and a large dish with the rest of the roasted veggies. We picked which one foods we liked and built our own salad.
If you grill okra, the slime will go away. Trust me on this one. The amount of vegetables are just recommendations, you can use as much or as little of each as you want--knowing that will affect the number of servings. I personally use more okra, because I actually really like it.
This serves 4 - 6.
Fish Sauce Fixes Everything
adapted from Bon Appetit
12 - 15 okra pods
3 ears of corn, shucked
2 large zucchini, halved lengthwise with insides scooped out
2 bell peppers
2 long red chiles (Holland or Anaheim) (optional)
1 - 2 small eggplants, cut lengthwise into 1" slices
1 T sea salt
1 t packed light brown sugar
2 T fish sauce
1 T lime juice
2 c (loosely packed) mixed fresh herbs--I like lots of mint and cilantro and some basil
4 c jasmine rice
Get the grill fired up--to a medium hot heat. Combine the okra, corn, zucchini, bell peppers, chiles, and eggplant in a large bowl. Drizzle with olive oil and sprinkle with salt, and toss. Grill the vegetables, turning frequently until they are crisp tender and lightly charred (about 8 minutes or so). Place the chiles in a medium bowl and cover tightly (this will steam the chiles and release their skins, making them easier to peel). Set the chiles aside.
Prepare the vegetables for serving. Cut the corn off the cob, place in a large bowl. Cut the zucchini and eggplant into irregular 1" pieces. Either place in the same bowl with the corn (or in our case, in a separate bowl). Trim any tough tops from the okra and cut the okra in half lengthwise and add to the other vegetables. Set aside.
If using the chiles, scrape off the charred skin and discard. Puree in a food processor. Add the sugar and process until dissolved. Stir in the fish sauce and lime juice (if not using the chiles, just combine the sugar, fish sauce, and lime juice).
To serve, scoop rice then top with the vegetables, followed by the fish sauce dressing and fresh herbs.
Monday, September 17, 2012
Saffron Rice
This is the best rice I've ever made in my entire life.
While that may sound a bit dramatic and superlative, it is true. In this dish, rice is not bland but flavorful and has the perfect texture. It pairs perfectly with the Chicken and Spinach of a month ago.
This serves 4 - 6.
Saffron Rice
from the Three Sisters Indian Cookbook
8 oz basmati rice
2 c water
2 bay leaves
4 cardamom pods, crushed
1 cinnamon stick (about 3 1/2 inches)
2 T butter
10 almonds
10 cashews
1/2 t cumin seeds
1 inch piece of ginger, grated
2 T plain yogurt
1 t saffron soaked in 2 T hot milk
Gently wash the rice in a sieve under cold water until the water runs clear. In a bowl, soak the rice in the water with the bay leaves, cardamom pods, and cinnamon stick for 30 minutes. Drain rice and spices, reserving the water. Set aside.
While the rice soaks, heat 1 t of butter in a small frying pan over medium heat and fry the nuts until golden. Remove with a slotted spoon and let drain on a paper towel.
Heat the remaining butter in a medium saucepan over medium heat. Add the cumin seeds and cook until they begin to sizzle, then add the ginger and a dash of salt and pepper. Fry for 20 - 30 seconds. Add the drained rice and spice mixture. Stir in the yogurt and reserved water and bring to a boil. Partially cover and simmer for 3- 5 minutes. Fully cover the saucepan, reduce heat to medium, and simmer for 6-8 more minutes. Remove the rice from the heat. Spread the nuts over the rice. Drizzle with the saffron milk and let rest (off of the heat) for 15 minutes before serving.
To serve, fluff the rice with a fork.
Thursday, September 13, 2012
Pimiento Cheese
I have finally figured out what to do with all the peppers that multiply in my crisper drawer so quickly. The bell peppers never last long. I know those have no spice and they get through into a variety of things---beans, fancy tuna salad, sloppy joes. However, there's a whole group of peppers that show up in my box that aren't bell peppers and don't tend to have any spice. These tend to be the longer peppers--orange or light yellow in color, occasionally red. Every once in a while they may have a slightly mild spice, but that is rare. I don't risk it though by cooking them in sloppy joes or other foods I know the kids I love.
Those peppers, the mystery ones with not much (any) spice become pimiento cheese. I know this is my second pimiento cheese recipe. This is the good recipe.....the roast your own peppers recipe with not a lot of mayo and lots of cheddar cheese. For good measure, toasted pecans are also added.
Curtis, Isaac and I love this recipe. M hasn't wanted to try it, so I haven't encouraged her (nope, I don't want to share). I think I have kept J in the dark knowing about it's existence as well, because there's a good chance he'll like it, too.
Homemade Pimiento Cheese
adapted from farmhousedelivery.com/blog
1 lb grated cheddar
4 - 6 sweet peppers (the long, slender, multi-colored assortment, not bell peppers)
2 small hot peppers, minced (purely optional--I omit since Isaac likes this recipe)
1/3 c pecans, toasted and chopped
1/4 - 1/2 c mayo
Roast the sweet peppers (not the spicy peppers though). I prefer to do this on a gas grill. Brush each pepper lightly with oil and place on hot grill. Turn occasionally, until all sides are lightly charred. This can also be done on the top of a gas stove (directly on the flame) or in the oven. Once all sides are charred (will probably take 8 - 12 minutes or so on the grill, depending on how hot your grill is), place in a bowl and cover. Allow to steam for 10 minutes or so. With the blunt side of a knife, gently scrape charred skin off of the peppers. Remove the seeds. For best taste, do not rinse the peppers. Chop the peppers.
In a medium to large bowl, combine the cheddar with the roasted, chopped sweet peppers, the minced hot peppers, pecans, and 1/4 c mayo. Taste and add more mayo if you need a bit more (I love mayo, so I usually need a bit more...always a bit more mayo). Season to taste with black pepper.
Serve with crackers or make into sandwich. I like to make grilled pimiento cheese sandwiches. It's also really good with a slice of prosciutto.
Tuesday, September 11, 2012
Thai Chicken with Dipping Sauce
Each summer seems to have a theme. There was the summer I made lots of Italian food, the summer I cooked a little from Julia Child's cookbook, the summer of Greek food. If there was a way to summarize this summer, it would have to be the summer of the fish sauce.
Our family loves fish sauce. All of us. We fell in love with it through Vietnamese food and have continued loving it all throughout Southern Asia.
This was the perfect grilling recipe for me, because there was no messing it up. The chicken gets charred on the grill and then cooked in the oven. I am comfortable with cooking chicken in an oven---the grill not so much.
We loved this recipe. I adapted the types of chicken parts used to fit our family---three leg quarters and half a split chicken breast made everyone happy.
Serves 4 -6
Thai Chicken with Dipping Sauce
adapted a bit from Food and Wine
1/4 c cilantro, finely chopped
2 T Asian fish sauce (I like 3 Crabs brand these days)
1 1/2 t black pepper
4 chicken leg quarters or any combination of leg quarters and breasts, skinned (but bone in)
1/2 t tamarind concentrate dissolved in 1 t water
1/4 c Asian fish sauce
2 T lime juice
2 t sugar
1 T water
1 small chile, seeded and minced (optional)
1/2 c cilantro, chopped
In a small bowl, combine 1/4 c cilantro, 2 T fish sauce and black pepper (if you have a mini-food processor, you can use this instead). Coat the chicken with the cilantro fish sauce marinade and let stand at room temperature for 20 minutes.
While the chicken marinates, light a grill and preheat the oven to 400 degrees. Grill the chicken over moderately high heat, turning, until charred, 12 minutes or so. Transfer the chicken to a baking sheet and roast for 30 minutes or until cooked.
While the chicken cooks, mix together the tamarind concentrated dissolved in water, 1/4 c fish sauce, lime juice, sugar, water and chile (if using). Just before serving, stir the cilantro into the dipping sauce. Serve with the chicken and brown rice.
Tuesday, July 31, 2012
Chicken with Spinach
My favorite thing about our CSA is figuring out how to use strange/new vegetables. This summer, we've been getting Malabar spinach with a great day of regularity. Upon googling this leafy green, I learned a couple of things. 1) It is not even related to spinach. 2) If it isn't cooked long enough, it's slimy like okra when it's cut. 3) It lends itself well to substituting for spinach in Indian recipe.
I found some recipes online using Malabar spinach, but was quickly scared away. The ingredient list had several things I had no idea what they were. They called for dal. What? I thought dal was a lentil soup. This clearly wasn't working, so I turned to the library. I found a cookbook called The Three Sisters Indian Cookbook by Sereena, Alexa, and Priya Kaul.
Again, this wasn't without challenges. These sisters are Indians who emigrated to Britain. If you've ever tried to cook from British recipes, you realize how many differences in the language there are. All the measurements are different and you are told to preheat your oven first in celsius, then farenheit, and then gas mark.
We really enjoyed this. We served it with saffron rice, a store bought mango chutney, and naan. Mmm. Most authentic Indian food I've ever cooked (and best tasty too).
This serves 4.
Murgh Aur Palak
(also known as Chicken with Spinach)
adapted from The Three Sisters Indian cookbook
1 lb spinach leaves or as much as malabar spinach as you have
3 T oil
1/4 t cumin seeds
1 1/2 lb boneless, skinless chicken breasts, cut into bite sized pieces
1 t ginger
1 t coriander
1 t ground fennel
1/4 t cumin
1 t chili
1/2 t garam masala
2 T tomato paste
1 c water
salt to taste
Wash and drain the spinach. Cut into medium sized pieces. Heat 1 T oil in a large skillet over medium heat. Add the spinach leaves and a dash of salt. Cook until spinach has wilted and has lost its slime (if using malabar spinach). Remove from pan and set aside. Heat remaining 2 T oil in skillet over medium heat. Add the cumin seeds and saute until the seeds begin to sizzle. Add the chicken pieces. Cook, stirring occasionally, for 10 minutes or until chicken pieces are cooked through and golden brown. Remove pan from heat and add ginger, coriander, fennel, cumin, chili, and garam masala. Return to heat and stir in tomato paste. Fry for one minute, then add water. Cover and cook for another 10 minutes, until chicken is tender. Add the spinach (and any remaining liquid) and cook for 5 more minutes.
Serve with rice (saffron rice if you have the time).
Thursday, July 12, 2012
Thai Turkey Burgers
Just a quick disclaimer. I loathe turkey burger. It's more or less bland and lacks personality. However, fish sauce fixes everything (more on that on another post). Get over your fear of turkey burger and make these tonight. Everyone in my family loved these.
Serves 4 or 5
Thai Turkey Burgers
adapted from Food and Wine
1/4 c onion
2 T cilantro
2 1/4-inch-thick slices of peeled, fresh ginger
1 jalapeno, seeded, and stemmed (optional--too spicy for my fam)
1 1/2 T fish sauce (nuoc mam or nuoc pla)
1 1/4 lbs ground turkey
1/4 c mayo
1 t Sriracha or chili garlic sauce (we prefer the chili garlic sauce)
4 or 5 hamburger buns (or brioche/kaiser rolls if you want fancier)
bread and butter pickles
lettuce
mint leaves
In a food processor, pulse the onion, cilantro, ginger, and jalapeno (if using) with the fish sauce until chopped (you can also do this by hand--I've done it both ways with good results). Transfer into a bowl and knead into the turkey. Gently pat the turkey mixture into four or five patties (we did five because that was how many we needed), about 1/2 - 3/4 inch thick.
Light a grill. Brush the burgers gently with oil and grill over moderately high heat. A warning: these burgers want to fall apart. Treat them quite gently to avoid this. Grill, flipping once, until golden, crusty, and just cooked through, about 8 - 10 minutes. While the burgers grill, also brush the rolls lightly with oil or butter and grill to just to toast.
Meanwhile, combine the mayo and the Sriracha/hot sauce.
To serve: Brush the buns with the mayo hot sauce, if desired. Top with burgers, pickles, lettuce, and mint if desired. (You could also use thinly sliced jalapenos if you didn't add those to the burgers.) Or, if your children are like mine, just top with ketchup and mustard. :)
Monday, July 9, 2012
Red Cabbage Salad with Fennel and Orange
Yes, I have somewhat abandoned this blog. Sad I know. However, I've been pulled back, mostly by myself because I realized that I am not going to be able to remember where I've found some of these great recipes I've been making in the past 6 months and have loved. Thus, some pared down posts. I'll apologize now for the lack of pictures, however, there will be recipes again. Somehow, as my kids get older and more independent I am not being granted copious amounts of time to cook, take pictures, and blog. Or maybe I am granted that time, I am just spending it in other ways. :)
The pumpkin seeds are great to snack, consider making double and keeping some around just to eat. :)
Serves 4 - 6 as a side, easily
Red Cabbage Salad with Fennel, Orange, and Pepitas
adapted a bit from Food and Wine
1 c raw pumpkin seeds
1 T tamari or regular soy sauce
2 T olive oil
1/2 T lemon zest, grated
2 T lemon juice
2 nice, juicy oranges
3/4 lb red cabbage, halved, cored, and thinly sliced
1 fennel bulb, halved, cored, and thinly sliced (optional, however if you can find it, use it!!)
1/4 c cilantro, chopped
Spread the pumpkin seeds on a cookie sheets (half jelly roll pan--with sides) and bake in preheated 350 degrees oven for 7 minutes or until golden brown. Drizzle with tamari/soy sauce and bake for 3 more minutes, until the seeds area crisp. Set aside.
Working over a bowl, cut the peel off the orange, making sure to get all of the white pith. Gently slide the knife in between the sections of the orange to release the fruit (without the tough membranes). This gets messy so work over a bowl and save all that wonderful juice for the salad. Cut the released fruit into small, bite-sized pieces.
In a large bowl, toss together the orange pieces and juice, cabbage, fennel, if using, and the cilantro. In a small jar, vigorously shake together the olive oil, lemon zest, and lemon juice. Pour over the cabbage mixture and toss gently. Immediately before serving liberally sprinkle with the roasted pumpkin seeds. Season to taste with salt and pepper.
Monday, February 27, 2012
Ginger Scallion Fried Rice
I am branching out from my weekend of exceptional eating to pull in a recipe from earlier in the week. This one will also be repeating itself frequently in menu rotation.
I remember eating a dish growing up called Vietnamese Fried Rice. It was made using leftover rice, peas, and pretty much whatever else my mom could find in the fridge. I had mixed feelings about it. I think I once loved it, but as I got older, I appreciated it less. I have never made that recipe myself, despite knowing exactly what cookbook it is in and what side of the page it is on.
 Then I stumbled across this recipe. The pictures promised me amazing things. If I ate this recipe, it would invoke the setting and feelings represented in this magnificent picture. Well, unfortunately I was not transported to snowy Yellowstone National Park Lodge in the middle of winter. However, I did find a new recipe that I love. It was a hit with everyone in the family and slight step up from the fried rice of my youth.
This is a good recipe to have everything mise en place (also known as prepped and ready to go before you start cooking).
Serves 4 - 5
Ginger Scallion Fried Rice
adapted from The Year in Food
4 T sesame oil
6 scallions, sliced, white and dark green parts kept separate
1 medium carrot, julienned or cut into matchsticks
1/2 c shelled, frozen edamame
3 T minced ginger
2 garlic cloves, minced
4 oz mushrooms, shiitakes are preferable, but white button mushrooms will do
2 medium eggs, beaten
3 c cold, cooked brown rice (white will do if you have no brown)
5 T tamari or soy sauce
1 c cooked, shredded chicken or tofu
Heat a large skillet over medium heat. Add the 1 T of sesame oil. Toss the white parts of the scallions and stir for about a minute. Add the carrots, edamame, ginger and garlic and stir to combine. Saute, stirring occasionally, for five minutes. Remove from heat and set aside.
In the same pan, add another T of oil. Add the mushrooms and saute until soft, stirring occasionally, about 5 minutes. Remove and add to carrot/edamame mixture. Increase the heat slightly, add another T of sesame oil and add the beaten eggs. Cook as if you were making scrambled eggs. When just cooked/scrambled, remove and add to carrot/edamame/mushroom mixture. Add remaining 2 T of sesame oil and the cooked rice. Spread rice evenly throughout pan and cook, stirring a little. Sprinkle some black pepper over top. After about five minutes (if rice seems to be sticking a lot to the pan, you can add some canola oil to the pan), add the tamari or soy sauce. Stir to combine. Add the bowl of cooked veggies and eggs and cooked chicken/tofu. Saute, stirring frequently, until hot, about 5 minutes. Remove from heat, sprinkle with dark green parts of scallions and serve.
I remember eating a dish growing up called Vietnamese Fried Rice. It was made using leftover rice, peas, and pretty much whatever else my mom could find in the fridge. I had mixed feelings about it. I think I once loved it, but as I got older, I appreciated it less. I have never made that recipe myself, despite knowing exactly what cookbook it is in and what side of the page it is on.

This is a good recipe to have everything mise en place (also known as prepped and ready to go before you start cooking).
Serves 4 - 5
Ginger Scallion Fried Rice
adapted from The Year in Food
4 T sesame oil
6 scallions, sliced, white and dark green parts kept separate
1 medium carrot, julienned or cut into matchsticks
1/2 c shelled, frozen edamame
3 T minced ginger
2 garlic cloves, minced
4 oz mushrooms, shiitakes are preferable, but white button mushrooms will do
2 medium eggs, beaten
3 c cold, cooked brown rice (white will do if you have no brown)
5 T tamari or soy sauce
1 c cooked, shredded chicken or tofu
Heat a large skillet over medium heat. Add the 1 T of sesame oil. Toss the white parts of the scallions and stir for about a minute. Add the carrots, edamame, ginger and garlic and stir to combine. Saute, stirring occasionally, for five minutes. Remove from heat and set aside.
In the same pan, add another T of oil. Add the mushrooms and saute until soft, stirring occasionally, about 5 minutes. Remove and add to carrot/edamame mixture. Increase the heat slightly, add another T of sesame oil and add the beaten eggs. Cook as if you were making scrambled eggs. When just cooked/scrambled, remove and add to carrot/edamame/mushroom mixture. Add remaining 2 T of sesame oil and the cooked rice. Spread rice evenly throughout pan and cook, stirring a little. Sprinkle some black pepper over top. After about five minutes (if rice seems to be sticking a lot to the pan, you can add some canola oil to the pan), add the tamari or soy sauce. Stir to combine. Add the bowl of cooked veggies and eggs and cooked chicken/tofu. Saute, stirring frequently, until hot, about 5 minutes. Remove from heat, sprinkle with dark green parts of scallions and serve.
Thursday, February 23, 2012
Winter Lentil Stir Fry

This meal had mixed reviews from my family. Curtis and I loved it. The boys ate it pretty well too, especially the brussels sprouts (Yay for brussels sprouts loving boys). M refused it on the grounds of being too tired to eat something new. The original recipe called from a homemade mint sauce to drizzle over top. We don't currently have a thriving mint plant and buying fresh mint in the stores is a little costly. We opted instead to pick up some mint chutney at our favorite Indian restaurant just around the corner from us. It was actually cheaper and quite tasty. If you aren't a mint chutney fan, you could also top with some olive oil and Parmesan, goat cheese, or another chutney or curry sauce.
This meal will quickly find a place in our menu rotation. I figure next M may like it better, and if not, that is her loss---and our gain.
This will serve 4 -5.
Winter Lentil Stir Fry
adapted just a bit from 101Cookbooks.com
1 c uncooked brown lentils
olive oil
8 - 10 very small new potatoes, cut in half, or fourths if potatoes are on the large side
12 - 16 brussels sprouts, trimmed and halved (or quartered, again depending on size)
1/4 c almonds, sliced are preferable, but whole will do if that's all you have on hand, toasted
mint chutney
plain Greek yogurt for topping (optional)
In a medium saucepan, cover lentils with about 2 - 3 inches of water. Bring to a boil, reduce heat, and simmer 20 - 30 minutes, until lentils are soft but not mush. Drain and set aside.
In a large skillet, heat 1 - 2 T olive oil over medium heat. Put the potatoes in the skillet, cut side down and sprinkle with a little salt. Cover the skillet and let the potatoes steam for five minutes. Check the potatoes. If they are not fork-tender (but not mushy and falling apart), add 1/4 c of water, cover again and let steam for another five minutes. Once fork tender, stir them about a little. Add the lentils and cook until they are heated through. Remove from pan and set aside.
In the same skillet, add a little more olive oil and add the brussels sprouts cut side down. Over and cook for about 3- 5 minutes, or until the bottoms of the sprouts begin to brown. Taste a sprout to see if it is tender throughout. If not, cover and continue to cook. Once the sprouts are tender, uncover, increase the heat, and cook until the cut sides have begun to caramelize. Add the lentils and potatoes back to the skillet along with the toasted almonds. Heat and then put in a serving bowl or platter to serve. Drizzle with mint chutney and yogurt as desired.
Monday, February 20, 2012
Caramelized Onion Spinach Salad

My first dish I am going to share from our weekend of blissful eating was the last one I made. It is also one that fits perfectly with the produce to be found in Central Texas this time of year---spinach. We didn't offer this dish to the kids, Curtis and I were content to eat it all by ourselves. It was a side salad for our pizza, but we both agreed it could easily be the main course. It was also one of Curtis's favorite Spinach salads. Ever. That says a lot because that man loves salads.
A few notes on the recipe: When you caramelize the onions, if possible, don't use a cast iron pan. I tried out my new stainless saute pan I got for Christmas from my parents (By the way, I love it, Mom and Dad!). It's easier to caramelize them and a bit faster. The poached egg is optional. I am still working on mastering the poached eggs, I overcooked mine for my tastes (but Curtis thought his was perfect). I also had to throw one out in the process too because the yolk. Here's a hint: You can't poach an egg if you accidentally break the yolk trying to get a small piece of shell out of the whites.
Enough said. My notes are going to be way longer than the recipe itself!
Caramelized Onion Spinach Salad
adapted from coffeefoodwritergirl on food52.com
4 - 8 oz spinach, torn into manageable sized salad pieces
1 large yellow, thinly sliced
2 T extra virgin olive oil
2 T balsamic vinegar
1/2 t sea salt
1/2 t ground pepper
one egg per person eating
Wash and dry spinach. Place in a salad bowl. Over medium heat in a stainless pan (not nonstick, not cast iron if possible), heat the olive oil. Add the onions and a 1/4 t salt and saute until they are beginning to caramelize (some will be light brown in color. They will be very soft and pliable). Add the balsamic vinegar and continue until caramelized completely. At this point the onions will be very dark brown, rather shrunken, and very soft.
While the onions are caramelizing, poach your eggs. I could give you a long detailed explanation on my attempts. Since I still have varying degrees of success, I thought instead I would provide you to a link with step by step instructions and beautiful pictures. Here's how to poach eggs, thanks to Deb of Smitten Kitchen. To serve your salad. Pour the hot onions and olive oil that remains in the pan over the spinach. Season with the remaining 1/4 t salt and 1/4 pepper. Toss completely. When the salad is tossed, gently lay the poached eggs over the salad. Eat immediately.
Saturday, February 4, 2012
Wholesome Blueberry Muffins
There is definitely no confusing these muffins with cupcakes.
I've found sometimes that line is close to indistinguishable. For example, at grocery stores, I can buy chocolate chocolate chip muffins (and I even make a mean version of these), chocolate cherry hazelnut muffins, strawberry and cream muffins. They have close to the same, light crumb as cupcakes, they are just missing the icing. I've also made blueberry muffins which were a nice light yellow in color that my husband harassed me for being cupcakes. The handheld pastry definitions seem to blur easily....cupcakes masquerading as muffins because they lack frosting, muffins masquerading as scones because they are triangular. (I've had these fabulous "scones" at the farmers market that have the texture of muffins, but are triangular. If Brits saw those, I know they would be appalled and believe even more that us Americans are nuts.)
But I have digressed so far. These muffins are not cupcakes. They can not disguise themselves as scone if they shifted shapes. They are muffin. They are a little ragged on top. In my efforts to make my food that I eat matter more, I took a basic Moosewood muffin recipe and changed the grains a bit---substituting part of the white flour for whole wheat flour and hemp seeds. I used less sugar than most people would.
Verdict. Pretty good. Rather addicting in fact. The first bite is a bit of surprise because these aren't overly sweet and have a very nutty flavor because of the hemp seeds. However, once we each finished our first one, all four of us (the boys, a neighbor boy, and myself) had a second and a third one.
Of course, you could just use 2 c of white flour or throw in flax seeds instead of hemp seeds or just increase the amount of whole wheat flour. You could also use 3/4 c of sugar. Additionally, you could substitute other fillings as you desire--they should just equal 2 cups. As you can tell, this recipe is more of a template than formula. Play around until you find your ultimate morning muffin that may even leave you feeling a bit good about yourself.
This makes 12 regular sized muffins.
Wholesome Blueberry Muffins
based off a recipe from Moosewood Restaurant New Classics
1 1/4 c all-purpose flour
1/2 c whole wheat flour
1/4 c hemp seeds
1 t baking powder
1/4 t baking soda
1/4 t salt
1/4 t cinnamon
1 c frozen blueberries
6 T butter, at room temperature
1/2 c sugar
1 egg
1/2 c plus 2 T milk
1/2 t vanilla
1 c pecans and/or walnuts, chopped
In a large bowl, whisk together the flours, hemp seeds, baking powder, baking soda, salt, and cinnamon. Gently stir in the blueberries (flour on the blueberries before mixing with the wet ingredients prevents them to sinking to the bottom of the muffins). In a separate medium bowl, cream together the sugar and butter until smooth, using an electric mixer. Beat in the egg, then add the milk and vanilla. The mixture will probably look lumpy and curdled (from the cold milk hitting the warmer butter). Using a rubber spatula, fold in the nuts. Add the wet ingredients to the dry ingredients and fold together with a rubber spatula, being careful not overmix and break up those lovely blueberries. Spoon about 1/3 c batter into each greased or paper lined muffin tin. Bake in a preheated 350 degrees oven for 30 - 35 minutes.
Enjoy.
Thursday, February 2, 2012
Vegetable Soup
Sometimes, only sometimes though, I am a bit of a slow learner.
M has been in school for 1 1/2 school years now. I've packed countless lunches, the majority of them peanut butter and jelly sandwiches with a piece fruit, raw vegetables or edamame, a cheese stick, and a snack. I haven't varied much from this, because M is happy with this lunch. After a year and a half packing pb&j sandwiches for lunch, I've discovered an alternative--the thermos.
I can hear everyone sighing and saying, "Well, duh, Melani. Those have been around as long as sliced deli meat" (I am making this up, by the way, don't quote me!). However, like I stated in the beginning, sometimes I am slow.
This vegetable soup has been one of M's favorite things to take her new thermos. She's been asking for me to make it again, both for supper and leftovers for lunches. Everyone else liked it too.
When I made this, I looked at the recipe and thought, another minestrone recipe just not labeled as minestrone. I guess it's not though. There is no pasta or cannellini beans. It could easily be made vegetarian by omitting the pork listed in the beginning and using a well flavored vegetable stock in place of the chicken stock. I actually didn't have potatoes when I made this, so I left them out and upped the amount of carrots I used. I also threw in some celery for good measure. Feel free to use the vegetables you have on hand. I could see this being a good recipe to throw some kohlrabi in.
I found this recipe at The Year in Food. There aren't a ton of posts, but when she does, the pictures are beautiful and the layout is uncluttered. There are usually a lot of vegetables featured, sometimes strange grains (quinoa), and it follows the agrarian calendar.
This recipe will make 8 - 10 servings.
Vegetable Soup
adapted slightly from The Year in Food
4 oz pancetta or bacon (optional--can substitute enough olive oil to saute onion in)
1 onion, diced
3 stalks celery, diced
6 c chicken or vegetable stock (or a mixture of either of those and water)
28 oz diced tomatoes (fire-roasted are especially tasty)
4 med potatoes, cubed (optional)
1 -2 sm/med kohlrabi, peeled and diced (optional)
1 bunch kale, stems removed and chopped
salt and pepper, to taste
red chile flakes, to garnish
Parmesan or cheddar cheese, to garnish
Heat a large soup pot over medium heat. Add the bacon or pancetta and cook until the fat is rendered and it has browned (especially in the event you are using bacon, make sure it is good and cooked). Remove excess fat (more than 1 T). Add the onion and celery and cook until softened and onion is translucent. Add the stock/water and diced tomatoes along with the potatoes (or kohlrabi). Cover, reduce the heat to low, and simmer for 10 minutes, until the potatoes/kohlrabi are beginning to soften. Add the carrots and continue to cook the root veggies are cooked, but still hold together well (don't cook to easily breakable stage). Stir in the kale and cook just until kale has wilted and softened. Taste and season with salt and pepper.
Serve hot. Top with red chile flakes as desired and a grating of cheese.
Saturday, January 28, 2012
Asian Beef Stew
Once we discovered the wonder of the thermos we learned lunch options were endless. This was another one of M's favorites to take for lunch, however, she did have to beware of the aromatics.
The star anise may be a little hard to source. If you can buy it in bulk somewhere, it's very affordable and worth it. The dried shitake mushrooms also look really expensive you buy them bagged. They are also a lot cheaper if you can find them in bulk (possibly at Whole Foods if your Whole Foods is big enough). If you can't find them, just substitute cremini mushrooms. Shitake mushrooms give a nice meaty flavor to the stew. If you aren't a fan of a slight wine taste to your beef stews, just leave out the sake (or sherry). Just add a little of water to the pan to deglaze it.
This will serve 4 - 6 in these proportions.
Asian Beef Stew
adapted from monkeymom on Food52.com
3 lbs stew meat, cut into 1- 2 inch cubes
salt and pepper
1 - 2 T canola oil
3/4 c sake, sweet rice wine, or sherry (red)
1/4 c soy sauce
1 T brown sugar
3/4 t rice wine vinegar
1 1/2 c chicken stock
2 star anise
1" piece of ginger root, thinly sliced
4 garlic cloves, left whole
3 - 4 red chili peppers, fresh or dried (to taste)
3 whole dried shitake mushrooms, stems removed (can use fresh, just remove stems and quarter)
zest of 1 lime
3 - 4 carrots, peeled and cut into 1" pieces
1 lg daikon radish, peeled and cut into 1" pieces (optional)
Heat oil in a large dutch oven. Sprinkle beef cubes with salt and pepper. Brown beef in batches and set aside. Return meat and accumulated juices to pot. Add the sake (etc) or water to pot to deglaze. Bring to a boil and scrape up browned bits. Add the soy sauce and sugar. Add the rice wine vinegar, stock, star anise, ginger, garlic, chiles (if using), and mushrooms and bring to a boil. Add the lime zest. If meat is not covered with liquid, add enough water so meat is covered. Once the stew comes to boil, cover tightly (either with a lid or foil), and transfer to preheated 325 degrees oven. Cook for 1 hour. Stir and cook for a second hour or until meat is tender.
Return the stew to the stove. Remove the lid and simmer on medium heat to cook reduce the liquid, about 30 minutes. While the stew cooks down, in a separate saucepan, bring a pot of water to a boil. Place vegetables in boiling water and cook for 20 minutes or until tender. You want the carrots to stay bright orange and not to fall apart easily when stirred. Add the boiled vegetables to the stew.
Serve hot with either brown rice or noodles. Garnish with chopped green onion or a bit of lime juice.
Thursday, January 26, 2012
Feel Good About Yourself Breakfast Quinoa
In this new year, I am trying to better control my caloric and sugar intake. I partook too much over the holidays and I wasn't feeling great physically, so I decided it was time to be more intentional.
However, that doesn't mean I don't enjoy food. For example, last night we went to friends' house for supper and I took dessert. I had been craving Chocolate Bread Pudding so that's what I made. As I poured 2 c of heavy cream and 2 c of whole milk (not lowfat or nonfat the recipe specifically said), I cringed, imagining what this would do to my daily sugar intake, especially when I knew I was going to top this with Bourbon Pecan Caramel Sauce.
Oh, did I enjoy that bread pudding. It was so incredible. I suspect I'll dream about it for awhile. I left a great deal of the leftovers with my pregnant friend, so I wouldn't need to finish all of it myself, because I would. And I would have totally enjoyed it too.
However, this morning I wanted something that would make me feel more nutritionally good about myself. I needed something to help get me back on the straight and narrow, food wise.
This was my answer. I found it on 101cookbooks.com--the food blog for people who love food and want to eat more healthily. I must admit, I didn't love this recipe when I had it. A little salt helped a bit. What won me over though was the fact that 3 hours after breakfast I wasn't hungry. That did wonders for the recipe and convinced me to make it again.
This will serve 2 (which is enough for that because the kids aren't impressed).
Breakfast Quinoa
from 101cookbooks.com
1/2 c milk
1/2 c water
1/2 c quinoa (red, black, white, doesn't matter)
1/4 t cinnamon
1 c fresh or frozen berries (of course fresh is best, but in January, frozen will do)
1/4 c chopped pecans, toasted if desired
dash of salt
2 t honey or agave nectar (optional--I left this off my accident and didn't miss it at all)
In a small saucepan, bring water, milk, and quinoa to a boil. Cover, reduce heat, and simmer for 15 minutes or until the quinoa has absorbed the liquid. While the quinoa cooks, toast the pecans in a preheated 325 degrees over for 5 or so minutes, until the pecans are fragrant. Remove from heat and stir in the cinnamon and berries (if you are using frozen berries, you may put it over low heat to keep the quinoa from becoming cold from the frozen berries). Sprinkle with toasted pecans. Feel good about yourself for the morning
Sunday, January 22, 2012
Salted Choco Peanut Butter Cookies
Do I really need to comment on this recipe? Doesn't this title say it all?
I think so.
One ingredient note. If you can buy salt in bulk, buy just a tad of fancy salt, like maldon or fleur del sal. It's not expensive and it's divine. You can use the leftovers to make salted chile brownies.
Enough said. Here's the recipe.
This makes 3 - 4 dozen depending on how big you make them.
Salted Choco Peanut Butter Cookies
adapted from FoodBlogga on food52.com
1 1/4 c flour
1/2 c cocoa powder
1/2 t baking soda
1 t baking powder
1/2 t salt
1/2 c butter, at room temperature
1 c sugar
2 large eggs
2 t vanilla
3/4 c peanut butter (not natural, friends)
1 c chocolate chip
coarse sea salt
In a medium bowl, whisk together flour, cocoa powder, baking soda, baking powder, and salt. In a large bowl, cream together butter and sugar until light and fluffy. Add the eggs and vanilla, beating well. Add the peanut butter and beat until just combined. Add the dry ingredients and beat until just combined. Stir in the chocolate chips.
At this point, I usually refrigerate the cookies, mostly because I've run out of time. You can cook them right away (one of these times I am going to try that). I can't attest to the consistency differences between refrigerated or not, there are probably minimal.
Drop the cookies by teaspoonful* (like you use to eat, not measure) onto a greased baking sheet. If you refrigerated them, flatten them slightly with your hands. Sprinkle the top of each with a few coarse sea salt crystals. Bake the cookies in a preheated 350 degrees oven for 12 -14 minutes until the edges are firm. They'll firm up even more as they cool. Enjoy.
*If you desire bigger cookies use a heaping tablespoonful instead.
Saturday, January 21, 2012
So Much More than Beans and Rice
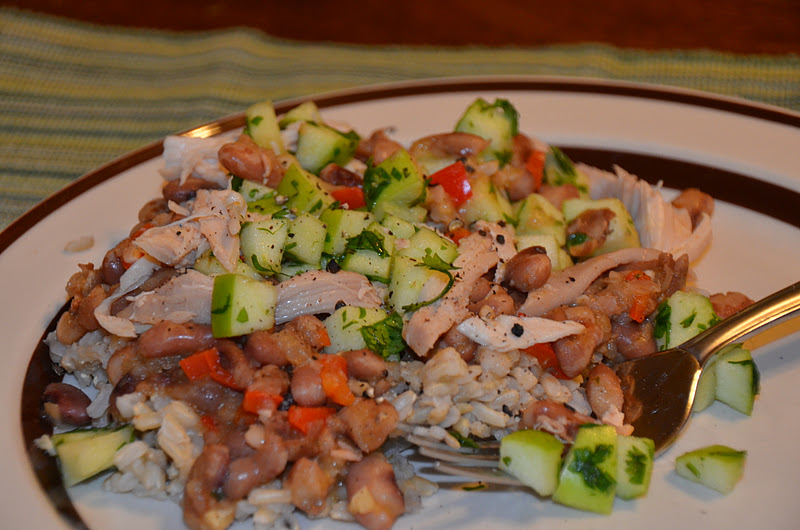
Those who have been reading this blog since is conception many moons ago, may remember, if you have a memory like an elephant, that M is not a bean fan. It often takes coercion, unless it is lentils which she loves.
Tonight, M ate only beans for supper.
Those who read my post two short posts ago may remember I said that my boys aren't eating my supper or liking my food. Today, J ate a serving of supper and asked for more. (Little I wouldn't touch, so at least someone is true to form).
I was less than excited about tonights' meal, part of our eat more healthy plan. Beans and Rice. Sigh.
This is so much more than beans and rice. It's what my family called Mexican haystacks (tacos on rice), but all together different. It's beans and rice go gourmet. It's absolutely yummy. I will make this again and next time, I'll be much more excited about making it. If you want to simplify this, use 1 - 2 cans of black beans in place of the dried beans. I prefer the dried beans because I better control the sodium content.
I changed up this recipe a bit. The original was in Bon Appetit's January 2012 issue.
This will serve 4 in these proportions.
So Much More than Beans and Rice
adapted from Bon Appetit
1 c dried anasazi or black beans
1 T bacon grease or olive oil (guess which I used)
1/2 onion, diced
1 lg clove garlic, minced
1 c Granny Smith apple, cored and chopped
1/4 c chopped cilantro
1/2 lime juiced
2 T olive oil
1/3 c (about 1/2 of...) red bell pepper
3 garlic cloves, minced
1 t chili powder
1 t ground coriander
1/2 - 1 t ground cumin
1 1/2 c chicken broth
3 c cooked brown rice
1 c cooked, shredded chicken (using a rotisserie chicken is easiest. Don't use frozen cooked chicken)
Cook anasazi or black beans. Quick soak method (because I always forget to soak them overnight): put the beans in a pot and cover with 3 inches of water. Bring to a boil, cover, and remove from heat. Let stand for an hour. Drain. In same pot, heat bacon grease or olive oil. Saute the onion until it is soft and slightly browned. Add the garlic and cook until fragrant. Return the beans to the pan. Cover with water (1 - 2 inches above the top of the beans/onions). Cook for 40 minutes for adzuki beans, or until tender. (Black beans will take a bit longer).
In a small bowl, combine the apple, cilantro, and lime juice. Set aside.
Heat 2 T olive oil in a saute pan or skillet. Add the bell pepper and cook until tender, about 5 - 6 minutes. Add the garlic, chili powder, coriander, and cumin and saute 1 - 2 minutes, stirring constantly. Add beans and broth. Bring to a boil. Reduce heat just until the beans are simmering briskly (not past medium in my case). Stir occasionally, smashing some beans with the back of a wooden spoon to help thicken the sauce. Cook for 8 - 10 minutes.
To serve: put a pile of rice on a plate. Top with beans followed by chicken and then apple/cilantro salsa. Season as desired with salt and pepper.
Wednesday, January 18, 2012
Sweet and Spicy Party Mix
I don't like party mix.
This is a bit of heresy in my family. Party mix was a part of winter. My parents would make roasting pans full of party mix, store in the huge (gallon or 2 gallon?) glass jars. Their recipe, which they dubbed Marty Pix had every kind of imagineable Chex (for the 80's--I think 4 different kinds), cheerios, peanuts, pretzels, lots of Worcestershire sauce, and, when my mom would given in, bacon grease, among other things.
I didn't like it. Every winter, my dad and I would have the conversation that went something like this: "You really don't like party mix? Why?" Every winter. It was part of the changing of seasons and shortening of the days. I think in those instances my dad wondered if I was really a Guengerich.
This year, I found a recipe. Against my better judgement I decided to try it. Wouldn't you know it, I liked it! It didn't use any chex or cheerios. It had no bacon grease. I discovered I could buy nuts in bulk and control the amount of different kinds of nuts, going light on the peanuts and heavy on almonds, pecans, and walnuts. I loved this party mix. I ate a whole batch almost single handedly while working on our Christmas cards/letters. I don't dislike party mix. I just dislike chex, cheerios, and peanuts doused in worcestershire sauce and salt.
The flavors are more subtle. I could taste the Crispix and pretzels. I noticed the different kinds of nuts. There was an occasional spicy bite (if I made this and didn't want to share with the kids I would up the cayenne) interspersed with some sweet tastes. I love it.
It's still January. The Super Bowl is coming. I think I may just need to make another batch or two for that occasion!
This makes 8 - 9 cups.
Sweet and Spicy Party Mix
from merrill on food52.com
5 c Crispix
1 1/2 - 2 c mixed nuts (buy in bulk if you want to control the types)
2 c tiny twist pretzels
5 T butter, melted
1 T Worcestershire sauce
1 T brown sugar
1/2 t onion powder
1/4 t garlic powder
1 1 /2 t fresh thyme, finely chopped (optional)
large pinch of cayenne
In a large bowl, combine the Crispix, nuts, and pretzels. In a small bowl, combine the remaining ingredients. Drizzle over the cereal mixture and combine with your hands, being careful not to break about the cereal and distributing the seasoning evenly.
Transfer to a 13 x9" baking pan and bake in a 250 degrees oven for 45 minutes, stirring every 15 minutes, until light and toasted. Allow to cool and enjoy.
Friday, January 13, 2012
Thai Curry Chicken Soup
In my search for "healthier" recipes, I looked for ones that are full of flavor, loaded with veggies, and are unique. As much as I love lentils and beans, I reach a saturation point after a while---two different lentil dishes plus their leftovers are about all I can handle. While this didn't have as much veggies as some, it still fit my healthier label.
We loved this soup. I greatly reduced the amount of spice in it so my kids would eat it and eat it M did! (I've pretty much given up with the boys eating much for supper....I think they eat enough during the day that by supper they're not super hungry...I remember M doing the same thing, then along came kinder and changed it. I've accepted the boys don't like anything I cook and M will eat almost anything because she is starving after school).
As is quickly becoming a trend, I want Asian flavored foods in the winter--something about fish sauce (of the Vietnamese nature), ginger, or star anise is comforting when it is cold. This soup didn't have any of these, but I did get to use a little more of my Thai red curry paste. The optional ingredients I didn't use, for obvious reasons if you know me (kids don't do spicy and I don't do corn). There is no set time for this to simmer. Like many soups, the leftovers are even better because the flavors had time to marry.
This should serve about 4 - 6.
Thai Curry Chicken Soup
adapted a bit from apartmentcooker on Food52.com
2 T olive oil
1/2 c onion, minced
1/2 c cilantro, roughly chopped
2 cloves garlic, minced
1 (14-oz) can coconut milk
6 c chicken stock (or a combo of chicken stock and water)
2 t (you can use up to 2 T) red curry paste
zest and juice of 1 lime
1 jalapeno, seeded and minced (optional)
1 T ginger, minced
2 scallions, thinly sliced
1-2 c mushrooms, thinly sliced
1/2 red bell pepper, thinly sliced
1 c corn kernels (optional)
1 1/2 c or so chicken, cooked and shredded
thinly sliced jalapenos
thinly sliced scallions
roughly chopped cilantro
lime wedges
avocado, thinly sliced (optional)
Heat 1 T olive oil in a dutch oven over medium heat. Add the onions and cook until softened. Add the garlic and cilantro and cook until fragrant, about a minute more. Add the coconut milk and chicken stock and bring to a simmer. Add the red curry paste and zest and juice of lime. Meanwhile, in a saute pan or skillet, heat the remaining T of olive oil over medium heat. Add the jalapeno, if using, ginger, scallions, mushrooms, red bell pepper, corn, and chicken and cook until heated, 4 - 5 minutes. Add to the broth. Simmer until the mixture has reached desired flavor. Season with salt.
To serve, ladle into bowls and garnish with jalapenos, scallions, cilantro, lime, and avocado as desired.
Friday, January 6, 2012
Lentils with 'Shrooms and Caramelized Onions
Hey. I'm back!! We'll see how good I do, but I hope to add a few new recipes that I've discovered and I plan to make over and over. I'll just tell you straight up that there probably won't be any pics for awhile. But there will be new posts!
We were in Virginia for Christmas. It was a wonderful week of other people cooking and a smorgasbord of desserts. There is no question where I get my dessert love from....6 kinds of cookies (by the end of the week, we all had discovered our absolute favorite kind---and they were different for each of us), incredible cheesecake, cherry pie, chocolate cake balls, ice cream, and frozen strawberries, grown in my parents' garden. When we got home, I decided we needed some healthier eating and this week, I've been looking for recipes to get me back on track. I've called it my own "cleanse" but those who do real cleanses would be affronted by this title. We've been eating not a lot of meat, lots of lentils and vegetables, and limited starches.
This was our second lentil dish in a week. I was worried it would be too similar to the mujadarra I made earlier in the week, but it was different enough that no one really minded lentils twice in one week.
The porcini mushrooms are optional, but well worth it if you can find it and/or afford them.
This was part of a really simple supper. Just this plus some peas. I omitted a carb entirely and no one really missed it.
This will serve 3 - 4 as a main course. If you serve it with rice, it should serve 4 comfortably.
Lentils with Mushrooms and Caramelized Onions
adapted just a tad from The Food Matters Cookbook by Mark Bittman
1 c uncooked French or green lentils (this can be done ahead of time)
1/2 c (about .5 oz) dried porcini mushrooms (optional)
2 T olive oil
1 large onion, halved and thinly sliced
1 lb mushrooms, sliced
1 T fresh thyme or 1 t dried thyme
salt and pepper to taste.
Make the lentils by putting the lentils in a medium pot. Cover with 3 inches of water and bring to a boil. Cover, reduce heat, and simmer for 20-30 minutes, until the lentils are tender, but not mushy. Reserve 1/2 c cooking water, then drain, and set lentils aside. (You can make the lentils hours ahead and just refrigerate until you are ready for them).
Put the porcini in a small bowl. Cover with boiling water and let soak for 20 minutes. When the porcini are soft, reserve 1/2 c of the soaking water, and then drain. Meanwhile, start caramelizing the onions. Put 2 T oil in a medium skillet over medium heat. When the oil is hot, add the onions, and cook until the onions are dark brown, but not burnt, about 15 minutes. Stir occasionally. Remove the onions from the pan and put into a small serving bowl. In the same pan, heat the remaining 2 T oil. Add all the mushrooms (dried and fresh). Cover the skillet, reduce the heat to medium-low and cook the mushrooms undisturbed for 5 minutes, or until the mushrooms have released their juice. Remove the cover, increase the heat to medium, and continue to cook until some of the sauce evaporates and the mushrooms are very soft, 5 - 10 minutes.
Stir in the lentils, 1/4 c of the reserved porcini water (or lentil water if you didn't use porcinis), and thyme. Taste and season with salt and pepper. Cook over medium heat until everything is heated through. Serve garnished with the caramelized onions.
Subscribe to:
Posts (Atom)